
Map edit mode
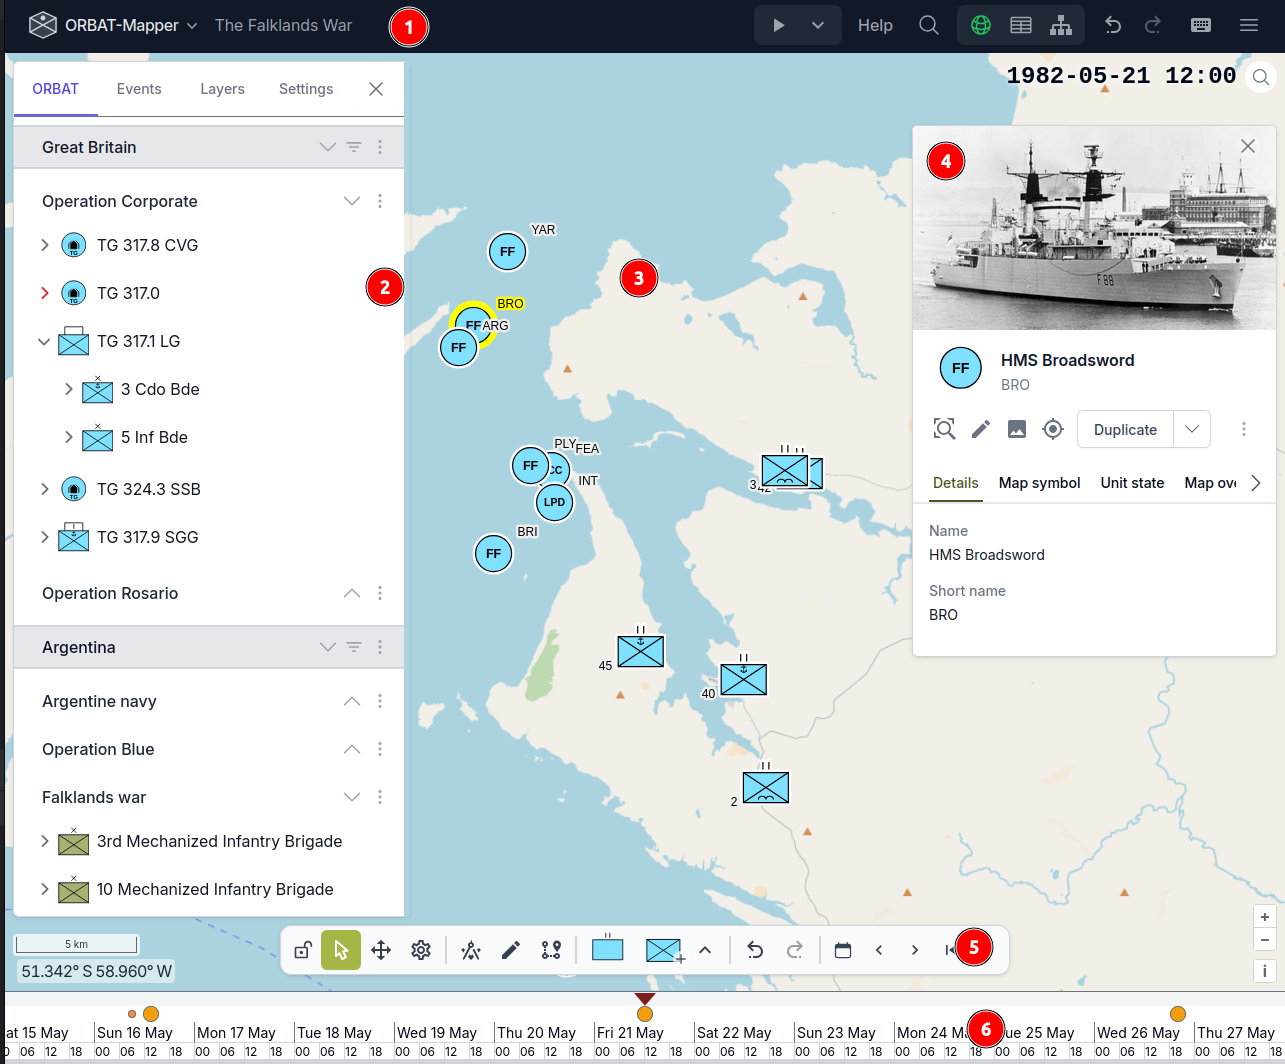
The map edit mode is the primary editing mode and consists of the following main parts:
- Navigation bar
- Main/ORBAT panel
- Map
- Details panel
- Map toolbar
- Timeline
Navigation bar

The navigation bar is located at the top of the screen and contains the following items:
- file menu
- scenario name
- playback menu
- help and search
- editing mode switcher
- undo/redo buttons
- keyboard shortcuts
- settings menu (hambuger menu)
File menu
From the file menu you can access most scenario related actions such as saving, loading, importing and exporting data. You also have easy access to various settings and tools. 
Main/ORBAT panel
The ORBAT panel on the left side displays the hierarchical order of battle — sides, groups, and units — as an expandable tree.
Browsing and selecting
- Click a unit to select it. Shift+click to range-select, Ctrl/Cmd+click to toggle individual selections.
- Use the arrow keys to navigate the tree.
- Expand or collapse units with the chevron icon, or use the side-level expand/collapse actions to open or close an entire side at once.
- Use the filter field at the top to search units by name. A location filter toggle narrows results to units near the current map view.
Drag and drop
- Drag units to reorder them or move them to a different parent.
- Ctrl/Cmd+drag duplicates the dragged units.
- Ctrl/Cmd+Alt+drag duplicates units including their state (positions and timeline data).
- Multiple selected units can be dragged together.
Clipboard
- Ctrl/Cmd+C copies selected units. Ctrl/Cmd+V pastes them into the target unit.
Context menus
Right-click or use the dropdown menu on sides, groups, or units to access actions such as edit, duplicate, move up/down, lock/unlock, hide/show, and delete.
Locked units and groups cannot be dragged or modified.
Map
The map is the central workspace where units are displayed as military symbols and map features are drawn.
Interacting with units
- Click a unit symbol to select it. Shift+click to add to the selection, or drag a box on the map to select all units within the area.
- Drag a unit to move it to a new position (requires Unit position recording to be enabled).
- Unit symbols include configurable rotation and labels showing unit names.
Drawing map features
Use the draw toolbar to create map features:
- Supported geometry types: Point, Line, Polygon, and Circle.
- A freehand mode is available for lines and polygons.
- Switch to edit mode to modify vertices of existing features, or translate mode to move entire features.
Map layers
The layers panel lets you manage feature layers, base map layers (XYZ tiles, TileJSON, KML), and overlays. Each layer supports visibility toggles, zoom-to, reordering, and deletion. Optional overlays include range rings and day/night shading.
Details panel
The details panel appears on the right when a unit or map feature is selected. It shows contextual information and editing controls.
Unit details
When a unit is selected, the panel shows:
- Details — name, short name, description, external URL, and initial location.
- Map symbol — SIDC code and symbol appearance options.
- Unit state — timeline entries showing position changes, status updates, and other recorded state at each timestamp.
- TO&E/S — table of organization, equipment, and supplies.
- Properties — max speed and average speed with selectable units of measure.
Actions available from the panel include zoom to unit, set location, duplicate, move in hierarchy, show in ORBAT tree, and delete.
Feature details
When a map feature is selected, the panel shows:
- Style — stroke color and width, fill, arrows (for lines), marker style (for points), and text labels.
- Details — name, description, and media.
- State — time-based state entries for the feature.
Map toolbar
The map toolbar includes select, move, and rotate modes for units. Rotate mode lets you drag on a unit (or selected units) to adjust symbol rotation at the current scenario time.
Recording
Recording controls determine which types of changes are captured on the scenario timeline as you edit. The Rec button in the toolbar shows the current recording state.
Recording modes
There are three independent recording modes that can be toggled on or off:
- Unit position — records changes to unit locations on the map. This is the only mode enabled by default, so moving units on the map is immediately timeline-tracked. If this mode is off, dragging units to new positions on the map is disabled.
- Unit hierarchy — records changes to unit organizational structure. When enabled, dragging a unit to a new parent or reordering units in the ORBAT panel creates a timestamped entry on the timeline instead of changing the hierarchy directly.
- Feature geometry — records changes to map feature shapes (points, lines, polygons). When enabled, drawing or editing a feature's geometry creates a timeline entry rather than modifying the feature directly.
All recorded changes are tied to the current scenario time. When you scrub the timeline, the scenario shows the projected state at each point in time based on the recorded entries.
Using the Rec button
Click the Rec button to toggle recording on and off:
- When recording is active, a red indicator and icons show which modes are enabled.
- Clicking the button stops all recording.
- Clicking it again resumes your previous recording configuration — the app remembers your last selection.
Use the dropdown menu (right side of the button) to open Recording Settings, where you can toggle each recording mode independently.
Timeline
The timeline is displayed at the bottom of the map editor and shows the scenario's time range. An amber histogram indicates where unit events are concentrated.
Navigating time
- Click anywhere on the timeline to jump to that point in time.
- Drag left or right to scrub through the scenario.
- Scroll wheel to zoom in and out.
- Event markers (amber circles) represent scenario events — click one to jump to it.
The current scenario time is shown in the time controller above the timeline, which also has buttons to step to the previous/next day or previous/next event.
Playback
Use the playback controls to animate the scenario over time:
- Play/Pause starts or stops automatic time progression.
- Speed can be increased or decreased (doubles or halves each step).
- Looping replays the selected time range continuously.
- Range markers let you set start and end bounds for playback.
Context menu
Right-click the timeline to access additional options:
- Zoom in / Zoom out
- Add a scenario event at the clicked time
- Hide the timeline